How to Create a WordPress Child Theme
To create a WordPress child theme, you must create a new folder in your site’s themes directory and add two essential files: style.css and functions.php. As a result, this process allows you to safely modify your website’s look and layout without losing your custom code when the parent theme updates.
To begin, in this guide, WebDreamAgency will show you how to create a WordPress child theme using both the manual method and an easy plugin-based method. Simply follow the steps below to create your child theme and start customizing your WordPress website with confidence.
Table of Contents
- What Is a WordPress Child Theme?
- Why Should You Use a Child Theme?
- Before You Start
- Method 1: Create a Child Theme Manually
- Method 2: Create a Child Theme Using a Plugin
- Common Mistakes to Avoid
- Frequently Asked Questions
- Final Thoughts
What Is a WordPress Child Theme?
Simply put, a WordPress child theme is a separate theme that inherits the appearance and functionality of another theme, known as the parent theme. In other words, it allows you to customize your website without directly editing the original theme files.
Because of this, you can update the parent theme whenever a new version is released without worrying about losing your custom CSS, PHP code, or template modifications.
Quick Tip
Essentially, think of a child theme as an extension of your main theme. Overall, it keeps your custom work separate, making future updates much safer and easier.
Why Should You Use a Child Theme?
Specifically, using a child theme comes with several benefits:
- ✅ Protects your customizations during theme updates.
- ✅ Keeps the parent theme files untouched.
- ✅ Makes troubleshooting much easier.
- ✅ Lets you safely modify CSS, PHP, and templates.
- ✅ Recommended for WooCommerce and custom development.
Before You Start
First of all, before creating your child theme, make sure you have the following:
- FTP access or your hosting provider’s File Manager
- A WordPress website with an active parent theme
- A text editor such as Visual Studio Code or Notepad++
- A recent backup of your website
Important
Above all, before editing any theme files, always create a complete backup of your website. In addition, if possible, perform your testing on a staging site instead of a live website. This helps prevent unexpected issues from affecting your visitors.
Method 1: Create a WordPress Child Theme Manually
Overall, creating a child theme manually only takes a few minutes and gives you complete control over your customizations.
1. Create a New Theme Folder
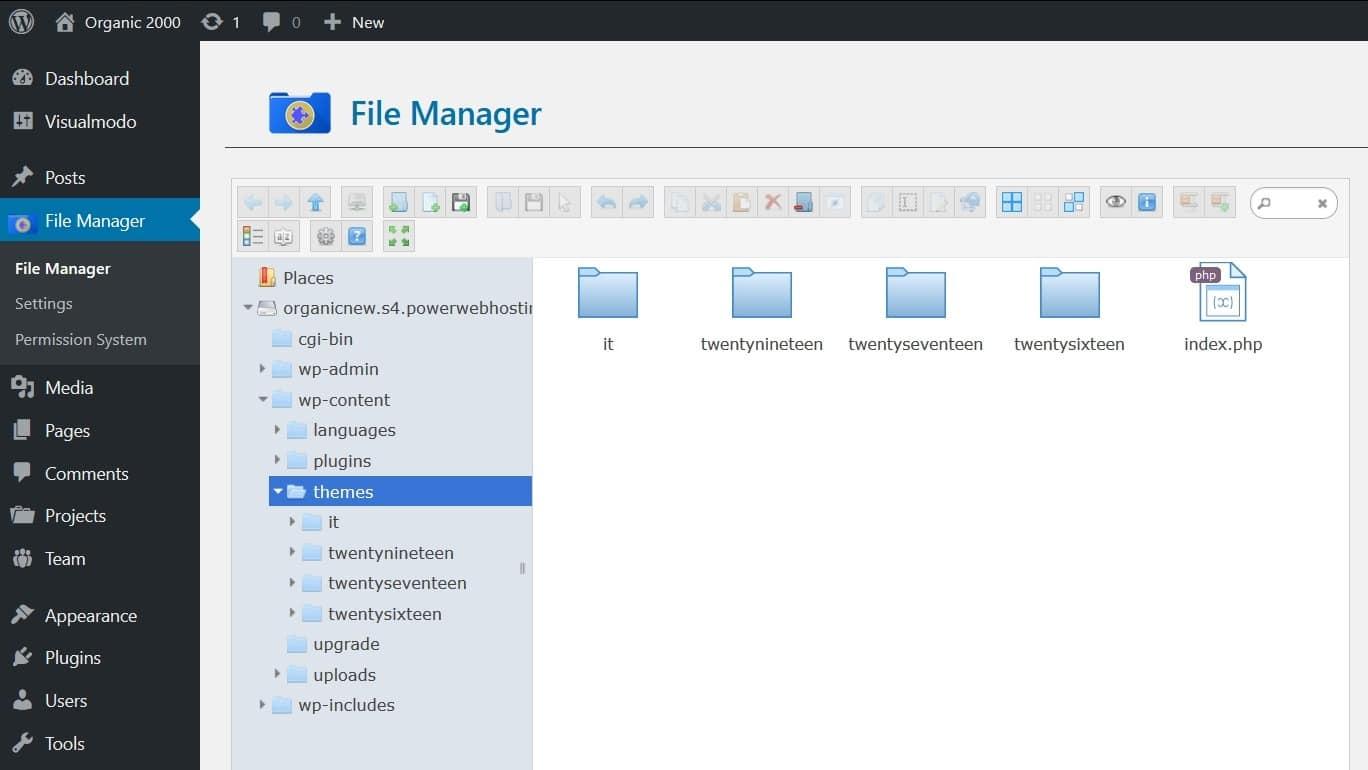
First, access your site’s files using an FTP client (like FileZilla) or your hosting provider’s File Manager. Next, navigate to the theme directory: /wp-content/themes/. Then, create a new folder for your child theme. Finally, name it using lowercase letters and hyphens; a best practice is to append -child to the parent theme folder name (e.g., twentytwentyfive-child).
2. Create the Stylesheet (style.css)
First, inside your new child theme folder, create a blank text file and name it style.css. Then, open the file and paste the following header code block at the very top:
/*
Theme Name: Your Theme Child
Description: A custom child theme for Your Theme
Author: Your Name
Template: your-theme
Version: 1.0.0
Text Domain: your-theme-child
*/
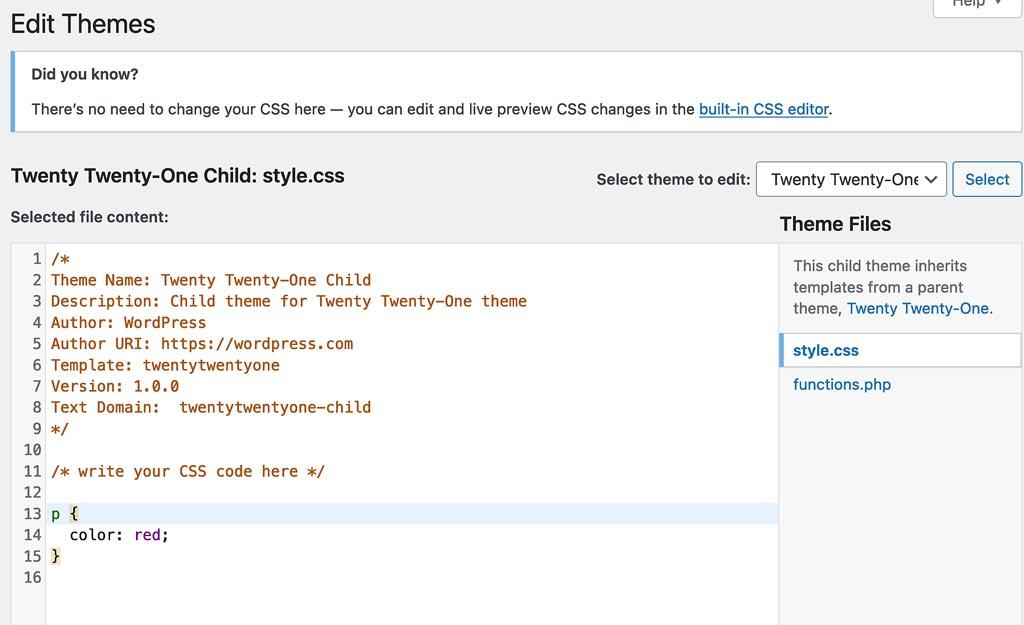
Crucial Rule: In particular, the Template: line is case-sensitive and must exactly match the exact folder name of your parent theme.
3. Create the Enqueue Script (functions.php)
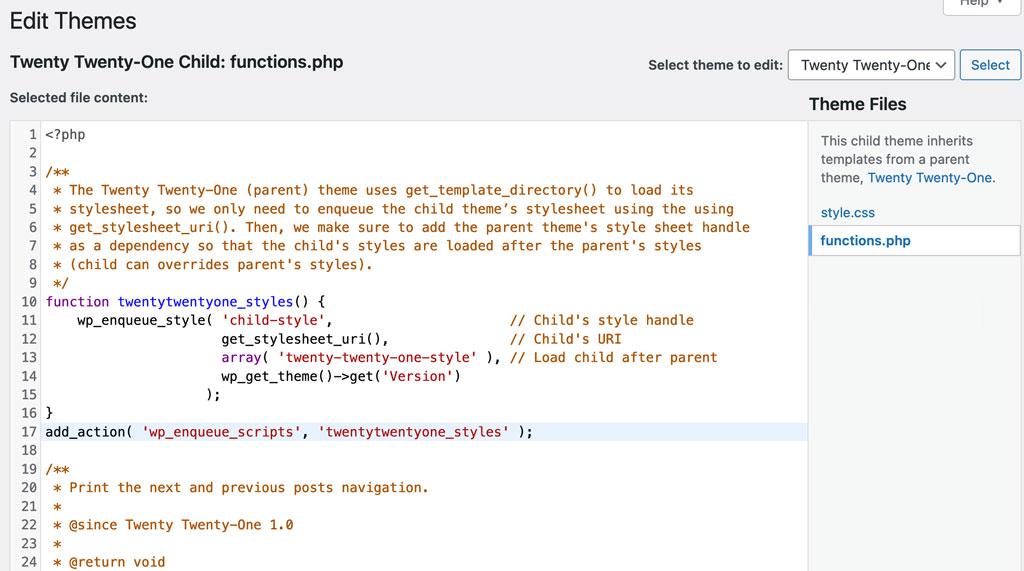
Similarly, create a second file in the same folder and name it functions.php. After that, paste the following code inside it to tell WordPress to inherit and load the parent theme’s styling:
<?php
add_action( 'wp_enqueue_scripts', 'enqueue_parent_styles' );
function enqueue_parent_styles() {
   wp_enqueue_style( 'parent-style', get_template_directory_uri() . '/style.css' );
}
?>
4. Activate the Child Theme
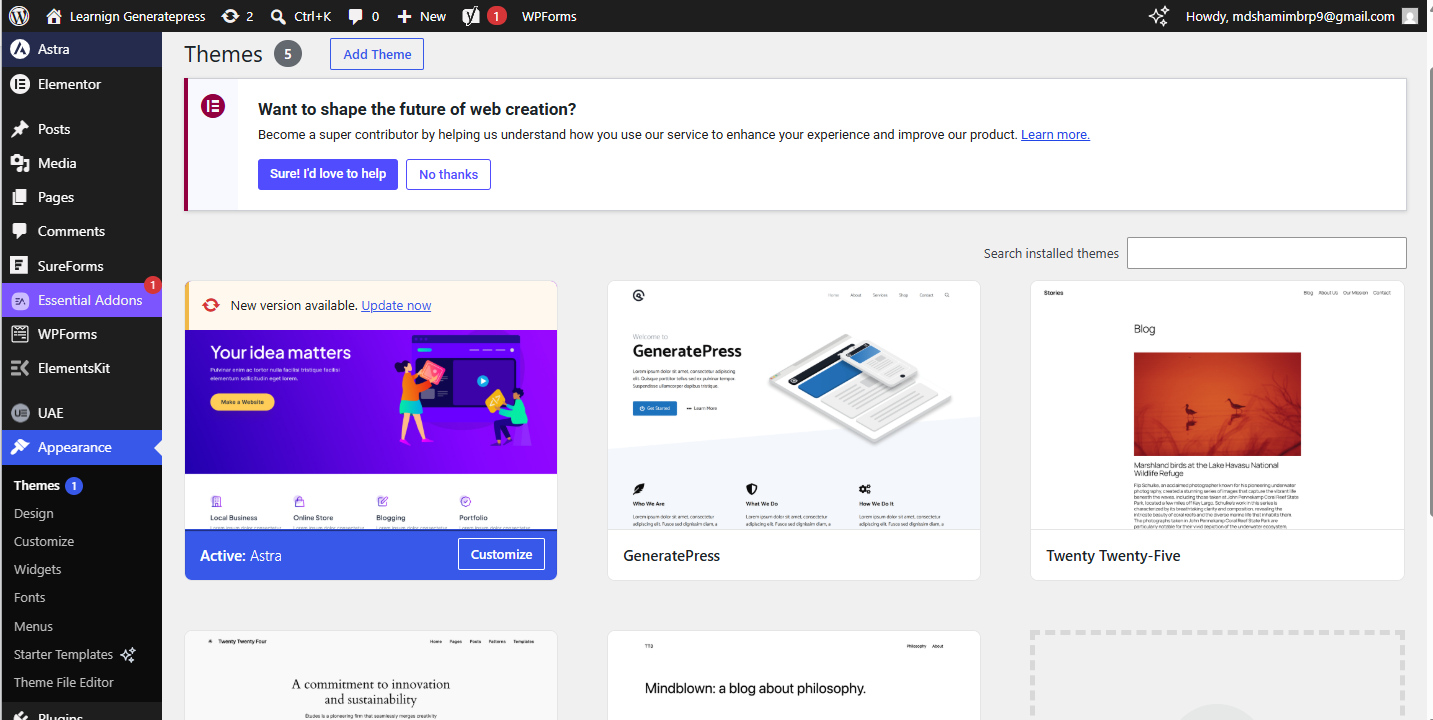
Once your files are ready, log in to your WordPress dashboard. From there, go to Appearance > Themes, find your newly created child theme, and click Activate.
Also, optionally, you can add an image file named screenshot.png directly to the child theme folder to act as the theme’s thumbnail preview inside your dashboard.
Optional: Add a Theme Thumbnail
For example, to give your child theme a professional appearance in the WordPress dashboard, create an image named screenshot.png and place it in the root of your child theme folder. The recommended size is 1200 × 900 pixels.
Method 2: Create a Child Theme Using a Plugin
Alternatively, if you don’t want to create files manually, you can use a WordPress plugin to generate a child theme automatically. Indeed, this method is ideal for beginners who are not comfortable editing website files.
Install a Child Theme Plugin
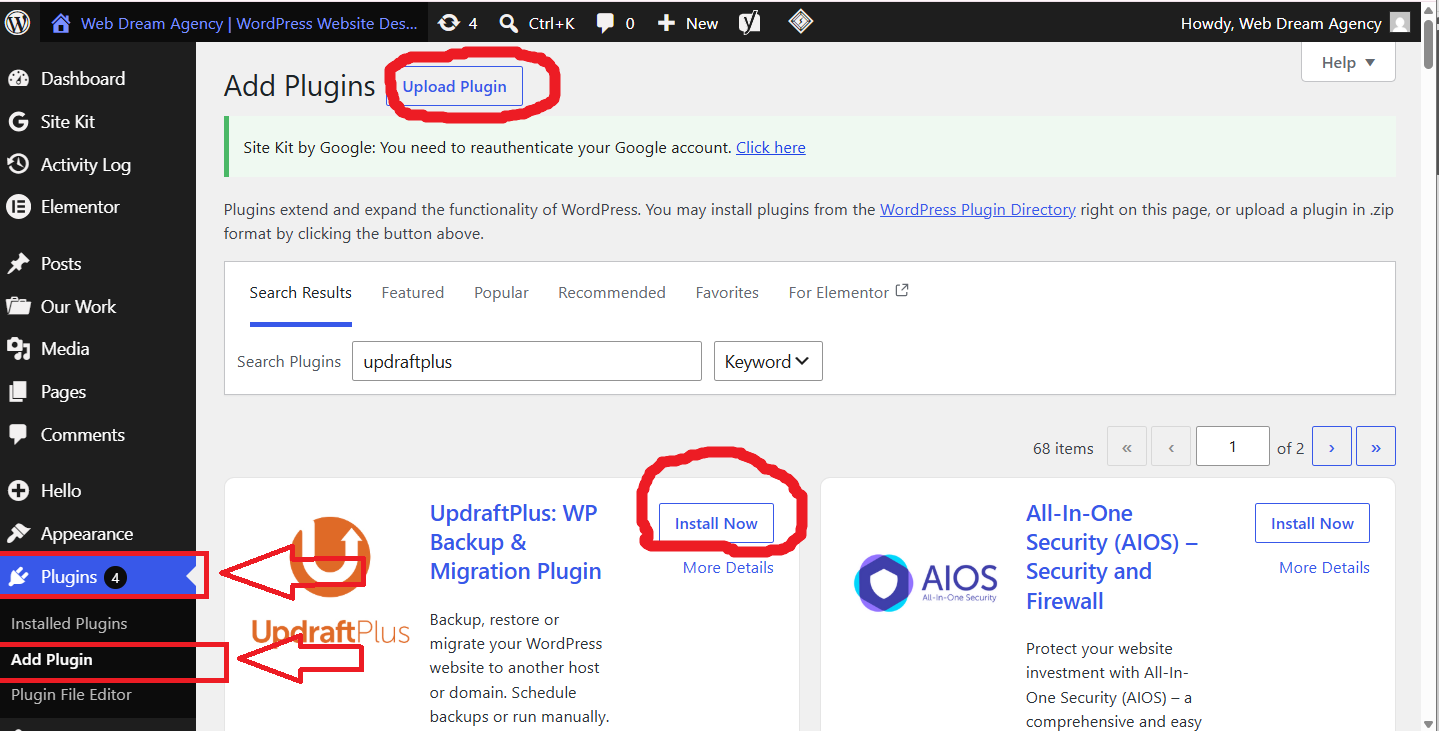
To begin, log in to your WordPress dashboard and navigate to Plugins → Add New. From there, search for one of the following free plugins:
- Child Theme Configurator
- Generate Child Theme
Once you’ve found one, install and activate your preferred plugin.
PRO TIP
Before installing any plugin, check its ratings, active installations, and recent updates to ensure it’s reliable and compatible with your WordPress version.
Analyze Your Parent Theme
After activating the plugin, go to Tools → Child Themes. From there, select your currently active parent theme and click Analyze.
Consequently, the plugin will scan your theme to ensure it supports child themes and identify any configuration requirements.
Note
Typically, most popular WordPress themes support child themes, so the analysis usually completes without any issues.
Generate the Child Theme
Once the analysis is complete, leave the default settings unless you need advanced customization. Then, scroll down and click Create New Child Theme.
As a result, the plugin will automatically create all the required files and folders.
Activate the Generated Child Theme
After the child theme has been created, go to Appearance → Themes. Find your new child theme, then click Activate.
From that point on, your website will use the child theme while continuing to inherit all the functionality and styling from the parent theme.
IMPORTANT
After confirming that your child theme is working correctly, you can uninstall the child theme generator plugin if you no longer need it. In fact, the child theme will continue to function normally because it doesn’t depend on the plugin after creation.
What Can You Customize with a Child Theme?
Overall, a child theme allows you to safely customize almost every aspect of your WordPress website. Here are some common modifications you can make:
Customize CSS Styles
For instance, you can add your own CSS rules to change colors, fonts, spacing, layouts, buttons, and other visual elements.
Override Theme Templates
Additionally, you can copy template files from the parent theme into your child theme and edit them without affecting the original files. Common template files include:
- header.php
- footer.php
- single.php
- page.php
- archive.php
- search.php
Add Custom PHP Functions
Furthermore, you can use the child theme’s functions.php file to add custom functionality such as:
- Registering new widget areas
- Adding custom image sizes
- Enqueuing scripts and styles
- Creating custom shortcodes
- Modifying WordPress hooks and filters
Customize WooCommerce
In particular, if you’re running an online store, a child theme is the safest place to customize WooCommerce templates. Specifically, you can modify the product pages, shop layout, cart page, checkout page, and My Account page without affecting future WooCommerce or theme updates.
Child Theme Customization Overview
| Feature | Can You Customize? | Typical Use Case |
|---|---|---|
| CSS Styles | Yes | Change colors, typography, layouts, and spacing |
| Theme Templates | Yes | Modify header.php, footer.php, single.php, etc. |
| PHP Functions | Yes | Add custom features using functions.php |
| WooCommerce Templates | Yes | Customize shop, cart, checkout, and product pages |
| JavaScript Files | Yes | Load custom scripts for additional functionality |
| Images & Fonts | Yes | Add custom assets and branding elements |
Pro Tip: Ultimately, a child theme keeps all your customizations separate from the parent theme, so you can safely update the parent theme without losing your changes.
Common Mistakes to Avoid
Notably, many beginners accidentally break their child themes by making simple mistakes. Therefore, avoid these common issues:
- ❌ Using an incorrect Template value in style.css.
- ❌ Editing the parent theme instead of the child theme.
- ❌ Copying the parent’s entire functions.php file.
- ❌ Forgetting to activate the child theme.
- ❌ Deleting the parent theme after activating the child theme.
- ❌ Testing changes directly on a live website without creating a backup.
WARNING
A child theme cannot work without its parent theme. Never delete the parent theme from your WordPress installation.
Frequently Asked Questions (FAQs)
General Questions
1. What is the purpose of a WordPress child theme?
A child theme allows you to customize your WordPress website without editing the parent theme directly. As a result, your changes remain safe even after updating the parent theme.
2. Do I always need a child theme?
Not necessarily. For example, if you’re only adding a few CSS rules, you can use Appearance → Customize → Additional CSS or the Site Editor (for block themes). However, if you’re editing templates, adding PHP code, or customizing WooCommerce, using a child theme is the recommended approach.
3. Can I update the parent theme after creating a child theme?
Yes. In fact, that’s the biggest advantage of using a child theme. As a result, your customizations remain safe when the parent theme is updated.
4. Can I delete the parent theme?
No. Since a child theme depends on its parent theme, deleting the parent theme will therefore stop your child theme from working.
Compatibility & Performance Questions
5. Does a child theme slow down my website?
No, not if it’s built properly. Indeed, a properly built child theme has virtually no impact on your website’s performance.
6. Can I create a child theme for any WordPress theme?
Generally, yes. Most WordPress themes support child themes; however, it’s always a good idea to check the theme documentation before creating one.
7. Should I use a plugin or create a child theme manually?
Overall, both methods work well. However, the manual method is best for developers who want complete control, while the plugin method is ideal for beginners.
8. Can I add custom JavaScript in a child theme?
Yes. For example, you can enqueue custom JavaScript files through your child theme’s functions.php file, just like you would with CSS.
9. Is a child theme necessary for WooCommerce customization?
Yes. In that case, if you plan to override WooCommerce templates or customize the checkout, cart, or product pages, a child theme is strongly recommended.
10. What’s the difference between a parent theme and a child theme?
Essentially, a parent theme contains all the original files and functionality, while a child theme inherits everything from the parent and stores only your custom modifications.
11. Can I create a child theme without coding?
Yes. For instance, you can use plugins like Child Theme Configurator to generate a child theme automatically without editing any files.
Key Takeaways
Before you start customizing your website, remember these important points:
- ✅ Always create a child theme before editing theme files.
- ✅ Never edit the parent theme directly.
- ✅ The Template value in style.css must match the parent theme’s folder name exactly.
- ✅ Keep the parent theme installed and updated.
- ✅ Test major changes on a staging website whenever possible.
Final Thoughts
Overall, a WordPress child theme is one of the safest and most effective ways to customize your website. It allows you to modify your site’s appearance, functionality, and templates while keeping the original theme untouched.
Whether you’re changing CSS styles, adding custom PHP functions, or customizing WooCommerce templates, a child theme ensures your work remains protected when the parent theme receives updates. Therefore, if you’re serious about building a professional WordPress website, learning how to create and use a child theme is a valuable skill that will save you time and prevent future headaches.
In short, whether you’re making simple design changes or building advanced WordPress functionality, a child theme provides a safe and future-proof way to customize your website. At WebDreamAgency, we recommend using a child theme before making any theme modifications so your customizations remain protected during future updates.